Yemen- Who are the Houthis? Zaidism, Rebel group

Who are the Houthis?

The Houthis are members of a rebel group, also known as Ansar Allah (Partisans of God), who adhere to a branch of Shia Islam known as Zaidism. Zaidis make up one-third of the population and ruled North Yemen under a system known as the imamate for almost 1,000 years until 1962.
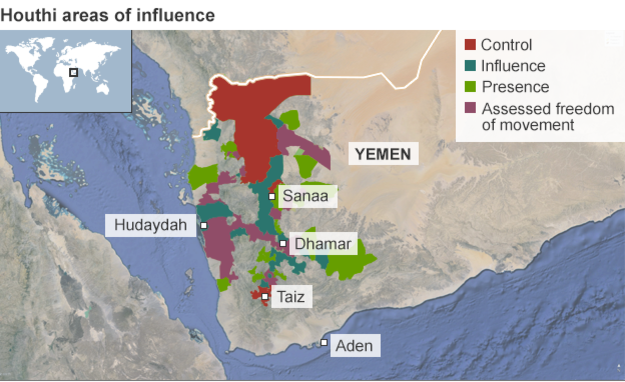
The Houthis take their name from Hussein Badr al-Din al-Houthi. He led the group's first uprising in 2004 in an effort to win greater autonomy for their heartland of Saada province, and also to protect Zaidi religious and cultural traditions from perceived encroachment by Sunni Islamists.
After Houthi was killed by the Yemeni military in late 2004, his family took charge and led another five rebellions before a ceasefire was signed with the government in 2010.


How to play magicka (online, LAN and virtual LAN)

how to play magicka (online, LAN and virtual LAN)


1- install skidrow's release
(note: in the end of the installation tick all 3 checkboxes to install everything the game needs to run)
2- install latest update (update 6 as of this moment) and don't use the crack files.
2.a)- if you cracked the game, reinstall the update. if you want to get rid of the crack files, delete skidrow.ini and steamclient.dll
3- in the game directory, create a notepad file. name it "steam_appid.txt". open it and type 73050 and save.
4- log in to steam (i advise you to use an empty account (no original games) as a precaution in case it gets banned)
5- add magicka as a non-steam game
6- launch magicka from steam
7- when in game, go to online multiplayer.
8- double-click on the server you want to join.
8.b)- if you couldn't find the server, ask the host for their IP address. using that address, click on IP-Address (ingame) and type it in.
9- click on any Join button, select your character. then click ready. when everyone's ready the host can start the game.
10- enjoy.

notes:
- game will eventually recieve new updates, so make sure you have the latest one to ensure you can play with other people.

technical notes:
- when using a virutal LAN (tunngle, hamachi, etc.) and your computer is behind a router or a DSL modem make sure you port forward the necessary ports (google them). some games require you to open some ports, so you might just open those too.
- the default port for magicka is 27016

How to know whether android shortcut already exist ex.


How to know whether android shortcut already exist
ex.

public void createShortcut(String url,String shortcutName, String type, Bitmap img)
    {           
        Intent shortcutIntent = new Intent();       
        shortcutIntent.setAction(Intent.ACTION_VIEW);

        if(type.equalsIgnoreCase("web")) {  

            Uri uri = Uri.parse(url);
            shortcutIntent.setData(uri);
        }
        else if (type.equalsIgnoreCase("app")) {

            Log.d("DEBUGGING", "Inside app installation " + url + " : " + group + " : " + shortcutName); 
            shortcutIntent.setClassName(url,group);
        }

        shortcutIntent.addFlags(Intent.FLAG_ACTIVITY_NEW_TASK);
        shortcutIntent.addFlags(Intent.FLAG_ACTIVITY_CLEAR_TOP);

        Intent addIntent = new Intent();
        addIntent.putExtra(Intent.EXTRA_SHORTCUT_INTENT, shortcutIntent);
        addIntent.putExtra(Intent.EXTRA_SHORTCUT_NAME, shortcutName);
        addIntent.putExtra("duplicate", false);
        addIntent.putExtra(Intent.EXTRA_SHORTCUT_ICON, scaledBitmap);
      //  addIntent.putExtra(Intent.EXTRA_SHORTCUT_ICON_RESOURCE, R.drawable.ic_launcher);

        addIntent.setAction("com.android.launcher.action.INSTALL_SHORTCUT");
        sendBroadcast(addIntent);
//        Toast mToast = Toast.makeText(this, "shortcut created", Toast.LENGTH_SHORT);
//        mToast.show();

    }

How to know my computer configuration in windows xp

Just do the following steps to know your computer configuration in windows xp


Goto Start > Run... > type dxdiag > Press OK
    There will be different tabs such as follows:
    Just Click on the preferable tab to view the desired configuration.
    You can view System, Display, Sound, Music etc.

How to identifying the genuine EasyCap DC60 v2.1c

Following are the ways to identifying the genuine EasyCap DC60 v2.1c :


- "EasyCAP" text in the main unit is printed with white color
- Installation CD is yellow
- RCA connectors are gold plated
- The name of the 32bit video driver is Syntek STK1150 or Syntek STK1160 with Philips SAA7113 chipset
- The name of the 64bit video driver is STK1160 ATV BDA with Philips SAA7113 chipset
- The name of the 32 & 64bit video driver is STK1160 Grabber with Syntek 8113 chipset
- The name of the 32bit and 64bit audio driver is USB Audio Interface or USB Audio Device with Philips SAA7113 chipset and with Syntek 8113 chipset

How to make UITextField readonly (but not disabled)?

iPhone/iPad: How to make UITextField readonly ?


iPhone/iPad: How to make UITextField readonly (but not disabled)?
- (BOOL)textFieldShouldBeginEditing:(UITextField *)textField {
    BOOL editable;
    if (textField == myReadOnlyTextField) {
        editable = NO;
    } else if (textField == myEditableTextField) {
        editable = YES;
    } else {
        // editable = YES/NO/Other Logic
    }
    return editable;
}
 
- (void)viewDidLoad {
    [super viewDidLoad];
    // .....
    myReadOnlyTextField.delegate = self;
    myEditableTextField.delegate = self;
}

How to use MuPDF with your EXISTING Eclipse project

How to use MuPDF with your EXISTING Eclipse project:


1. Copy the 'jni' folder from the <mupdf>/android folder into your existing Eclipse project.
2. Copy the <mupdf>/thirdparty folder into the 'jni' folder in your project.
3. Copy the <mupdf>/cbz folder into the 'jni' folder in your project.
4. Copy the <mupdf>/draw folder into the 'jni' folder in your project.
5. Copy the <mupdf>/fitz folder into the 'jni' folder in your project.
6. Copy the <mupdf>/generated folder into the 'jni' folder in your project.
7. Copy the <mupdf>/pdf folder into the 'jni' folder in your project.
8. Copy the <mupdf>/scripts folder into the 'jni' folder in your project.
8. Copy the <mupdf>/xps folder into the 'jni' folder in your project.
9. Open 'Android.mk' inside the 'jni' folder.
10. Change

MUPDF_ROOT := ..

to

MUPDF_ROOT := $(TOP_LOCAL_PATH)

11. Save 'Android.mk'.
12. Open 'Core.mk' inside the 'jni' folder.
13. Change

MY_ROOT := ../..

to

MY_ROOT := $(LOCAL_PATH)


14. Change all the

..

in LOCAL_C_INCLUDES to

$(LOCAL_PATH)

14. Save 'Core.mk'.
15. Open 'ThirdParty.mk' inside the 'jni' folder.
16. Change

MY_ROOT := ../..

to

MY_ROOT := $(LOCAL_PATH)

17. Change all the

..

in LOCAL_C_INCLUDES to

$(LOCAL_PATH)

18. Save 'ThirdParty.mk'.
22. Now execute 'ndk-build' in your project's 'jni' directory.
23. Copy everything in the <mupdf>/android/src folder into the 'src' folder in your project.
24. Copy everything in the <mupdf>/android/res/drawable folder into the 'res/drawable' folder in your project.
25. Copy everything in the <mupdf>/android/res/drawable-ldpi folder into the 'res/drawable-ldpi' folder in your project.
26. Copy everything in the <mupdf>/android/res/drawable-mdpi folder into the 'res/drawable-mdpi' folder in your project.
27. Copy everything in the <mupdf>/android/res/layout folder EXCEPT main.xml (because if you are copying into an existing project then you should already have your own main.xml or equivalent) into the 'res/layout' folder in your project.
28. Copy everything in the <mupdf>/android/res/values folder into the 'res/values' folder in your project. If you already have a 'strings.xml' in your existing project, copy everything in between the '<resources>' tags in your <mupdf>/android/res/values/strings.xml into your project's strings.xml (paste between the '<resources>' tags). Similarly with the 'colors.xml',  if you already have a 'colors.xml' in your existing project, copy everything in between the '<resources>' tags in your <mupdf>/android/res/values/strings.xml into your project's strings.xml (paste between the '<resources>' tags).
29. Open the 'AndroidManifest.xml' in project.
30. In between the '<application>' tags paste this:

        <activity android:name="com.artifex.mupdf.MuPDFActivity"
                  android:label="@string/app_name"
 android:theme="@android:style/Theme.NoTitleBar">
            <intent-filter>
                <action android:name="android.intent.action.VIEW"/>
                <category android:name="android.intent.category.DEFAULT"/>
                <data android:mimeType="application/vnd.ms-xpsdocument"/>
            </intent-filter>
            <intent-filter>
                <action android:name="android.intent.action.VIEW"/>
                <category android:name="android.intent.category.DEFAULT"/>
                <data android:mimeType="application/pdf"/>
            </intent-filter>
            <intent-filter>
                <action android:name="android.intent.action.VIEW"/>
                <category android:name="android.intent.category.DEFAULT"/>
                <data android:mimeType="application/x-cbz"/>
            </intent-filter>
            <intent-filter>
                <action android:name="android.intent.action.VIEW"/>
                <category android:name="android.intent.category.DEFAULT"/>
                <category android:name="android.intent.category.BROWSABLE"/>
                <data android:scheme="file"/>
                <data android:mimeType="*/*"/>
                <data android:pathPattern=".*\\.xps"/>
                <data android:host="*"/>
            </intent-filter>
            <intent-filter>
                <action android:name="android.intent.action.VIEW"/>
                <category android:name="android.intent.category.DEFAULT"/>
                <category android:name="android.intent.category.BROWSABLE"/>
                <data android:scheme="file"/>
                <data android:mimeType="*/*"/>
                <data android:pathPattern=".*\\.pdf"/>
                <data android:host="*"/>
            </intent-filter>
            <intent-filter>
                <action android:name="android.intent.action.VIEW"/>
                <category android:name="android.intent.category.DEFAULT"/>
                <category android:name="android.intent.category.BROWSABLE"/>
                <data android:scheme="file"/>
                <data android:mimeType="*/*"/>
                <data android:pathPattern=".*\\.cbz"/>
                <data android:host="*"/>
            </intent-filter>
        </activity>
        <activity android:name="OutlineActivity"
                  android:label="@string/outline_title">
</activity>

(taken from the AndroidManifest.xml inside the <mupdf>/android folder).

31. MuPDF in now in your existing Eclipse project. To use it, call up com.artifex.mupdf.ChoosePDFActivity.class in your application. This is the main class for MuPDF.